
What is Loopback and Why Would I Use it?
by Ian Howell
12 January 2022
Abstract
Loopback is a macOS based audio routing application created by Rogue Amoeba ($99). Much like a physical audio patch bay, Loopback allows you to send audio from any app or connected audio interface to any other app or connected audio interface. Loopback is intuitive enough to be useful out of the box, but it also offers features for power users. Those involved in online music production or education might be particularly interested in use cases such as: (1) recording audio from one app in another app, (2) sending audio from a microphone and multiple separate apps into Zoom for a webinar, (3) Routing audio from a low latency collaboration app (e.g., SoundJack, FarPlay) into a broadcasting app (e.g., Zoom, Restream) to stream a performance to a social platform (e.g., Facebook, Youtube), (4) Routing multiple channels of audio out of a low latency collaboration app into a multi-track recording DAW (e.g., Logic, Reaper).
License

This work is licensed by Ian Howell under the Creative Commons Attribution-NonCommercial-ShareAlike 4.0 International License. To view a copy of this license, visit http://creativecommons.org/licenses/by-nc-sa/4.0/ or send a letter to Creative Commons, PO Box 1866, Mountain View, CA 94042, USA.
Table of Contents
Introduction to thinking like a patch bay
Basics of Loopback’s interface
The Monitors column
The Pass-Thru tile
Multiple inputs and outputs
Common and advanced workflows
Record audio that is playing on your computer
Present a webinar in Zoom with multiple audio sources
Livstream a low latency performance to Zoom with bidirectional audio
Use a talkback mic or master monitor device
Manage a remote multi-track recording session in a DAW
A note about latency and sampling frequency
Conclusions
Introduction to Thinking like a Patch Bay
Loopback is a macOS based audio routing application created by Rogue Amoeba ($99). It functions as a virtual audio patch bay. In practical terms, this means that audio can be sent between any app or connected physical audio interface in real time. Most likely, if you are among the many musicians who were forced into teaching and collaborating online due to the pandemic, you have never seen a physical patch bay.
Why would we use one? Think about it this way. Let’s assume that we have a microphone, a microphone preamplifier, and a speaker. The simplest audio routing scheme would be to plug the mic into the preamplifier input, and the speaker into the preamplifier output. Sound goes into the mic, is amplified by the preamplifier, and is played back on the speaker (see figure 1).

Figure 1: Simple audio signal flow from a mic to a preamplifier to a speaker.
Now instead, consider what might happen if you don’t just want to make sound go from the microphone to the speaker. Maybe you have five microphones, and you want to send three of those signals to an external reverb effects unit before the sound reaches the speaker, and you want to send two of those microphone signals to a set of headphones as well. Or in the language of the pandemic, what if you want to stream audio from one app to another, or mix several real-world audio inputs into the mix that people hear through Zoom or another teleconferencing app (see figure 2)?

Figure 2: The far less simple needs of a modern online teacher.
Enter the patch bay.
Think of a patch bay (see figure 3) as a way to move the input and output plugs from all of your devices into one place. Why? Because then you never need to ever unplug anything from them. Instead, you make connections between your pieces of hardware as you need them, all at your patch bay. Patch bays typically feature two rows of physical sockets (a place to plug in a cable) on the front, and a similar number of input/output sockets on the back. You connect the inputs and outputs of your physical hardware on the back, and with a patch cable, can complete the circuit on the front to route any output to any input.

Figure 3: Behold, a simple example of a patch bay.
In a virtual space, on a computer, this can be extremely flexible. The output of your microphone can be routed to the input of as many apps as you like at the same time. The output of an app can be routed to the input of any other app you like. Loopback is based on, but not limited by, the idea of a physical patch bay.
Basics of Loopback’s Interface
When you first open Loopback (see figure 4), you will see two main columns in the graphical user interface (GUI). On the left is your devices list (currently empty). On the right are the settings and routing details for the selected device. First step is to make your first device by clicking the “+ new virtual device” in the lower left-hand corner. This will create a new device (see figure 5 top) in the device list and will populate the settings and routing area with some rectangles and connection cables (blue/green lines).

Figure 4: A clean slate when you open Loopback for the first time.
Note that the device is named “Loopback Audio” and that the name is highlighted (see figure 5 top). You may change the name now or change it later by clicking on the edit pencil icon. Note that the entry in the devices list has an on/off switch and a volume slider. The on/off switch activates or deactivates the virtual device and the volume slider globally changes the volume for the entire virtual device. NOTE that any active card will appear in your available audio devices list in other apps, even if the Loopback app is not running. To deactivate a Loopback device, turn it off (see figure 5 bottom).


Figure 5: (Top) Making your first Loopback virtual device. (Bottom) How to turn it off.
In the right settings column, notice that there are now three smaller columns. From left to right, Sources, Output Channels, and Monitors. To select audio to route, add it in the Sources column by clicking the + (see figure 6). Any app that is running, any system level process, and any connected audio interface or virtual device (including other Loopback cards that are on) will appear in this list. If you wanted to combine your built-in computer microphone and the audio from a YouTube video playing in Chrome, you would add each of those from this list (see figure 7).

Figure 6: How to add a new audio source in Loopback.
In figure 7, notice that I have clicked the little down arrow labeled “options” in the Chrome and MacBook pro microphone tiles. Here you will find a volume slider to balance these sources. For any apps you add here, there is also a “mute while capturing” option. This is checked by default, but you will want to uncheck this every time to start. There is also an on/off switch per tile and a level meter. Here you can see that signal is flowing from both Chrome and the MacBook pro microphone into the two-channel output tile.

Figure 7: Route more than one audio source to the same audio output.
Notice as well that adding these Source tiles automatically connects them to the Channels 1 & 2 tile in the Output Channels column with virtual patch cables. This is the default behavior when adding a new Source tile. You may select (command-select selects more than one) any of these and press delete in the lower left to remove them. You may connect any output in a Source tile to the input of an Output Channel tile by clicking and dragging a new virtual patch cable. Unfortunately you cannot reposition an already connected virtual cable and must delete and add a new one.
In order to route this combined audio into another app, choose the Loopback device as the input in that app. In Audacity, it would look like figure 8. In Zoom, the virtual device similarly appears in the list of possible microphone sources. Anything that is fed into the Output Channels 1 & 2 tile in that Loopback virtual device will flow into any app that selects that virtual device as the input source.

Figure 8: Selecting a Loopback virtual device as the input in an app.
Here (see figure 9) I have mixed both left and right channels from Chrome to the left channel of the output title and routed the MacBook pro to the right channel. I also deleted the virtual cables connected to the Pass-Thru Source tile (more on that below). This routing looks simple with a single stereo output tile and one or two channel Source tiles. However, the same functionality applies if you have an eight-channel audio interface or want to create a Loopback device with multiple Output Channels (more on that below).

Figure 9: Using the virtual patch cables to connect the output of a Source tile to the input of a channel output tile.
The Monitors Column
The Monitors column offers you the ability to pass audio flowing in and out of a Loopback virtual device to a specific playback device at the same time. Above I mentioned that you have to be careful that Loopback mutes audio Source tiles when capturing by default. This means that if you add Chrome as a source and leave it muted in Loopback, you will hear it until you assign that virtual device as an input to another app. If Audacity is capturing the audio, and “mute while capturing” is checked in Loopback, the audio will stop playing back through your speakers or headphones.
There is more than one way to think about this, and it depends on how complex your setup is. For simple workflows, I would recommend unchecking mute and leaving the Monitors column empty. If you do end up using a monitor, it looks like figure 10 and follows the same rules regarding virtual cable connections. As with the Sources and Output Channels tiles, you may add as many Monitor tiles as you wish and route whatever outputs you wish to them.

Figure 10: Adding a monitor to listen to the output of this virtual device (note that this plays through the Sources even if they are muted as in the Google Chrome tile.
The Pass-Thru Tile
The Pass-Thru tile is a powerful feature. You will always add a physical audio interface (or another virtual device) as its own Source tile. You can add an app as a Source tile or set a Loopback virtual device in the output settings of the app. If you have an app that allows you to designate an output, selecting the Loopback virtual device will send the audio from the app to the Pass-Thru channels. E.g., in Audacity (see figure 11), selecting this Loopback virtual device as the output sends all playback from Audacity into the Pass-Thru channels. Once that audio has entered the Loopback virtual device through the Pass-Thru, it may be routed like any other source.

Figure 11: Selecting a Loopback virtual device as the output in an app sends that audio to the Pass-Thru tile.
Why might you choose to add a Source tile rather than set the output of an app to the Loopback virtual device Pass-Thru? In some cases, it does not matter which approach you use. In some cases an app has no separate audio input/output settings and you must use a Source tile; Chrome, for example. Sometimes you want to assign your audio interface to the input/output of an app and then also siphon the audio off to a recording app. In this case you would add the app as a Source tile. Sometimes you want to send audio directly from one app to another. In this case you would make a single Loopback virtual device and set it as the output of one app and the input of the other. This will make use of the Pass-Thru and feed the audio directly without needing to add any Source tiles. Loopback is flexible enough to offer more than one solution to these signal flow challenges.
Multiple Inputs and Outputs
Up to this point, we have seen that Loopback allows one to add multiple Source tiles and a Pass-Thru to combine and route audio to a single stereo output tile. However, you may add as many total Output Channels as you need by clicking the + to the right of “Output Channels.” In the image below (see figure 12), I have added six more Output Channels but Loopback currently supports up to sixty four. Note that the Pass-Thru Source tile now has eight channels as well. If I select this card as the input in Audacity (or another DAW like Logic), I can record eight separate tracks at once (see figure 13). Using the virtual patch cables in Loopback, I can send any audio source to any channel. If I select this Loopback virtual device as the output in an app, I can send multiple separate channels out of that app at once.
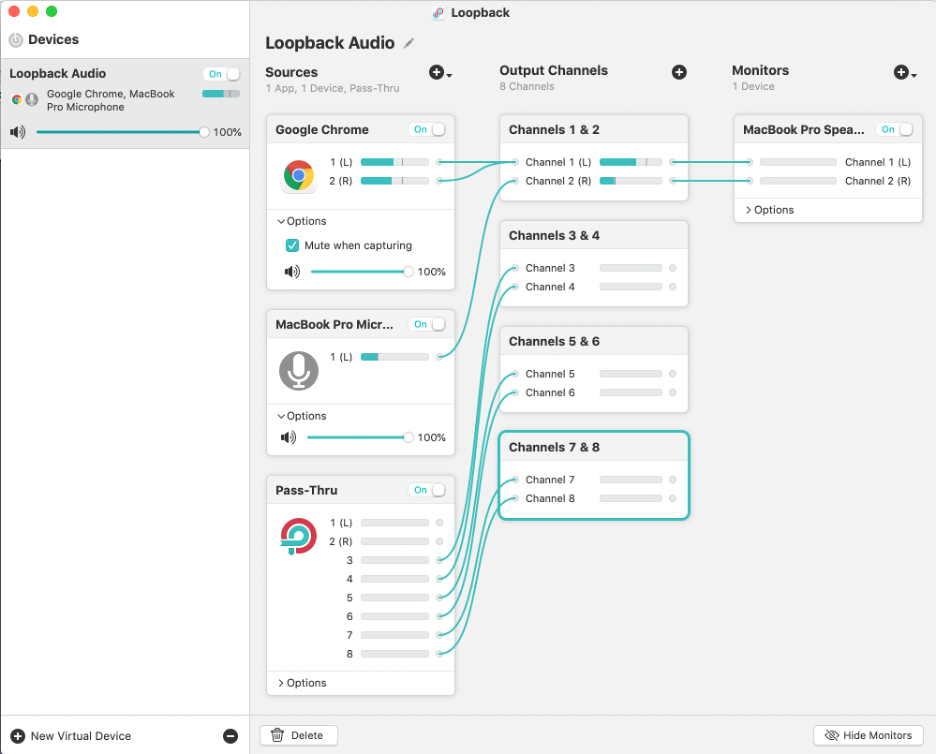
Figure 12: Adding six more Output Channels makes this an eight in/eight out virtual device.

Figure 13: If the eight channel virtual device is selected as an input in Audacity (or another DAW), you can record up to eight channels at once.
Common and Advanced Workflows
In this section I will outline how to use Loopback for a few common workflows and offer more advanced extensions that might be useful.
Record audio that is playing on your computer
This is a really common use case, especially if you want to rip a small piece of audio from a recording for analysis, or if you want to record a lesson if your platform has no recording feature. Simply add the app you want to record from as a Source tile and add that virtual device as the input in your recording app. Figure 13 above shows what this would look like in Audacity, but it will be similar in any app.
Present a webinar in Zoom with multiple audio sources
This is one of the simplest ways to use Loopback. You are the only sound source, and you have audio coming in from several apps and a microphone at once. Add your microphone and your apps as Source tiles, expand the option per tile and uncheck “mute while capturing,” and select this Loopback virtual device as the microphone input in Zoom. Use the volume sliders on each input tile to balance their relative volumes and click the on/off switch per Source tile to mute that source if you like. This is especially helpful if you are going to play an extended audio sample from another app, and you want to mute your microphone.
Livestream a low latency performance to Zoom with bidirectional audio
If you want to livestream a performance using SoundJack, FarPlay, or another low latency app, you have two options. This is thoroughly explored in another paper on this website, but the basic concept is easy to teach. If you are not participating as a low latency performer, you will crosspatch your low latency app to Zoom. This means that you create two Loopback virtual devices. Name one “LL In/Zoom Out” and the other “Zoom in/LL Out.” In the low latency app, select the device with “LL in” in the name as the input and “LL Out” as the output. Do the same for Zoom, but with the relevant name. This will send the output of Zoom through the Pass-Thru and into the low latency app. Similarly, the output of the low latency app will Pass-Thru into the input of Zoom. This workflow allow Zoom participants to interact with the low latency performers with bidirectional audio.
If you want to participate in the low latency performance, you have other options. If using SoundJack, set your audio interface as the input and output in SoundJack, and add SoundJack SJC as a Source tile in a Loopback virtual device. Add this virtual device as the microphone input to Zoom, and those participating on Zoom will hear the low latency performance. Bidirectional audio does not work in this case.
If using the Broadcast Output feature in FarPlay, set the Loopback virtual device as that output. Make sure to add as many channels to the virtual device as you have output channels in FarPlay.
Use a talkback mic or master monitor device
One of the great features of Loopback is the ability to add a Loopback virtual device as a Source tile in another Loopback virtual device. A useful example is in the low latency, bidirectional connection to Zoom scenario described above. If you would like to be able to talk to both the low latency participants and the Zoom participants from your computer, and also be able to quickly mute your microphone to both, create an additional Loopback virtual device called, “Talkback.” Select your microphone as the only Source tile in your talkback virtual device. Click in both of your other virtual device cards and add “Talkback” from the list of sources (see figure 14). Your talkback microphone will now be sent to participants on Zoom and on the low latency app. You can quickly mute your microphone to all participants by turning the “Talkback” virtual device off in the left Devices column.

Figure 14: You can even nest virtual devices within other virtual devices (here adding the “Talkback” virtual device to add a talkback mic to another virtual device.
If your workflow involves audio coming in from multiple sources at once, you can also create a “master monitor” virtual device. In that case, leave all the Source tiles muted, and then add the specific sources you want to monitor to a new virtual device. Add a single Monitor tile to your headphones or speakers. This keeps you from having to click through multiple virtual devices to mute a specific source. As with the talkback mic solution, it only really makes sense if you have a more complex setup.
Manage a remote multi-track recording session in a DAW
If you have a low latency app capable of outputting separate output audio streams (e.g., SoundJack), set the output in SoundJack to a multichannel Loopback virtual device. Set this as the input in your DAW and each separate low latency app channel will flow into its own track in the DAW. This is more throughly covered in another paper on this website.
A Note About Latency and Sampling Frequency
Why not just use a Loopback virtual device for everything? Fair question. The one scenario in which you really want to avoid using a virtual device is if you are sending audio into a low latency app. Loopback does an amazing job at introducing no clicks, artifacts, or audio dropouts as it works. However, this comes at a cost of 20 ms of additional latency. In Zoom, Cleanfeed, or similar mid to high latency apps, it does not matter. 20 ms is basically a rounding error given Zoom’s high latency. But in a true low latency app like SoundJack or FarPlay, 20 ms will break functionality. So unfortunately Loopback is not a good solution for someone looking to stream a virtual Midi instrument from one app into a low latency app.
Also be aware that Loopback virtual devices behave like any other sound card in the macOS. This means that you can set the sampling frequency in the audio/midi setup app (see figure 15). This app comes installed with all macOS computers. You MUST match sampling frequency between the apps that you connect with your virtual devices. This means that if you add Zoom as a Source tile (Zoom runs at 48 kHz), your virtual device must also be set at 48 kHz for both input and output (see below). Loopback almost always guesses correctly. If you hear any clicks or glitches in your audio, this is the most common reason.

Figure 15: Use audio/midi setup (a macOS utility) to check the sampling rate of your Loopback virtual device. Make sure it matches the settings in all the apps you connect.
Conclusions
I hope that you are now excited to dive into what Loopback can do. If you have used it before and never been able to make it do what you want, I hope that this guide has provided both simple steps to follow, and also offered a way to think through how you might use it.