

Multitrack Workflows in SoundJack
by Ian Howell
25 November 2020 | v.0.9
Use Cases
Two general types of workflows, a multitrack recording session and a live broadcast, benefit from a deeper understanding of how SoundJack handles audio streams and how one might get independent incoming streams out of SoundJack separately. For most users, all audio will eventually collapse down to a two channel, stereo mix. You cannot broadcast surround sound to YouTube, and most consumers cannot play it back.
The advantage of outputting sound from SoundJack in a multitrack format and creating the stereo mix later is basically the same for all workflows: It allows one to process the audio in a way that makes the final stereo product better. In the case of a multitrack recording session, it allows one to add compression, reverb, and other effects to each track independently; allows one to separately edit any glitches due to network or human error after the fact; and allows for rebalancing each track’s volume independently. Anyone who has recorded the stereo mix of a SoundJack session straight to either the Fastmusic Box or to an app on a computer understands that it is not possible to go back and address these issues once they are fixed as a stereo recording.
A live broadcast, e.g. using Zoom (as outlined here) to send SoundJack audio to non-performing participants, may seem like a less intuitive candidate for a multitrack workflow. However, given the variability of recording setups in many homes, the need to set consumer preamplifiers low enough to avoid distortion of a dynamic musical sound source, and the limited dynamic range of SoundJack’s 16-bit audio format, the ability to insert a multiband compressor per incoming stream followed by a final multiband compressor for the stereo mix can make a huge difference. One could also insert reverberation to create a sense of ambience, or throw in a tape delay/phaser/boomerang/distortion plugin. Go wild; follow your bliss and make cool sounds.
Table of Contents
License
Use Cases
Introduction
Requirements
Understanding Audio Routing in SoundJack
The audio input/output
The send channels
The hexnut audio input channel selector
The map channel selector
Examples
Conclusions
License

This work is licensed by Ian Howell under the Creative Commons Attribution-NonCommercial-ShareAlike 4.0 International License. To view a copy of this license, visit http://creativecommons.org/licenses/by-nc-sa/4.0/ or send a letter to Creative Commons, PO Box 1866, Mountain View, CA 94042, USA.
Introduction
SoundJack is an incredibly powerful audio transmission app. Because it allows for multiple peer-to-peer (p2p) connections on a single call, one may achieve total one-way latencies that fall below the perceptual threshold of lag. This means that musicians can make real time, synchronous music collaboratively online. What one does with this is a challenging question to answer. SoundJack is, essentially, a really complicated microphone cable. It takes sound from one place to another. What one could do with a microphone cable is a question with equally limitless answers.
Up to this point, I have focused on practical workflows to get musicians collaborating again. The point was the experience—the rehearsal, lesson, coaching—not to make an edited or polished artifact for real time or after the fact consumption by non-participants. We didn’t need to create recordings or live concerts this fall, we needed to reclaim the simple musical interactions that Covid 19 has taken from us. However, now that our community has had the time to move out of a crisis posture and must consider how to thrive under our current limitations, more advanced workflows are needed.
This guide explores how to get independent incoming audio streams out of SoundJack separately using Rogue Amoeba’s Loopback ($99) on MacOS. Similar solutions are possible with Blackhole, Jack Audio, etc, and this is possible on Windows 10 and Linux computers as well with appropriate software. The basics will remain the same regardless of the specifics of each audio routing app. My personal opinion is that free solutions almost always cost time. Solutions that cost money will generally work better and with less effort. Your mileage may, of course, vary, but this guide aims to offer workable, rather than comprehensive workflows.
Requirements
These workflows require:
A MacOS computer. SoundJack will run on Windows, however the way in which the operating system itself handles audio is disadvantageous and introduces additional challenges. The more powerful the MacOS computer, the more you will be able to do at the same time at lower buffer settings. As these workflows presume one connects to SoundJack at high latencies (as an observer rather than a participant), most apps allow for setting audio buffers high enough that a variety of computers work.
Rogue Amoeba’s Looback app ($99)
Whatever app you wish to funnel the individual audio streams into. This could be:
A DAW like Logic Pro X, Reaper, or Cubase (set to 48kHz)
A broadcast or video conferencing app like Open Broadcasting Software (OBS), Zoom, Jitsi, Wirecast (set to 48kHz)
A VST plugin host like Gig Performer or Element (set to 48kHz). This allows you to apply effects live, before passing the audio streams along to a broadcast or video conferencing app.
Headphones and a talkback mic of some sort (can be the built-in Mac microphone, a USB microphone, or a microphone with an external audio interface
Understanding Audio Routing in SoundJack
Audio routing in SoundJack can be understood in terms of four settings. Together they determine how many channels of audio can go in and out of SoundJack, how many are specifically pulled from your audio interface into SoundJack, which of the available inputs of that audio interface are pulled in, and which output channel each incoming stream maps to. These are explored in the context of all the Stage features in The SoundJack Guide. The four settings are:
The audio input/output
The send channels
The hexnut audio input channel selector
The map channel selector (shown below expanded)
The following sections will take each feature in turn.
The audio input/output
The audio input/output dropdowns select your audio interface, either real or virtual. The number of inputs and outputs of that interface globally determine both how many simultaneous audio streams you can send and how many separate outputs you can assign incoming streams to. This means that if you have a stereo input/output audio interface, even if you take in four incoming audio streams, they all must overlap on those two output channels. If you have an audio interface with four outputs instead, you can map each of those four incoming audio streams to its own output channel.
Those SoundJack users with a basic consumer audio interface may have never stretched beyond a two-channel stereo output. However, by using Loopback, we can create a virtual audio card with additional output. E.g. the below image shows a virtual card (Loopback calls it a “virtual device”) with eight outputs. By default, this card begins with a single stereo Pass-Thru input and a single stereo Output Channels. By clicking the plus to the right of the Output Channels , I was able to add three more stereo pairs of outputs. This automatically added Pass-Thru inputs three through eight.

If this virtual card is selected as the audio output in SoundJack, you may route incoming audio streams to any output channel between one and eight. Please note, that it appears that the number of channels on the audio input device must match the number on the audio output device. An “Into SJ” card with a talkback microphone and enough channels to match the output channels might look like this:

You will not use the eight input channels (here a single talkback mic is added), but the inputs and outputs must match. If they do not, the VU meter in the left column of the Stage will turn red indicating an audio issue.
If you are new to Loopback, the virtual device layout can be a little confusing. Consider this flow:

In rough terms, your audio flows into SoundJack on whichever channel the “Into SJ” card outputs it. Here the microphone is sending to Channels 1 & 2, and you see those meters visible moving on the “Into SJ” Loopback device Output 1 & 2 tile. That audio goes into SoundJack. The incoming audio streams are mapped to an output channel. How many channels are available depends on how many output channels there are in the virtual output card, here, “Out of SJ.” Here the streams are mapped to channel 1, which starts the two-channel stream on output channel 1. Note that the Pass-Thru of “Out of SJ” is where this incoming stream arrives. At that point you could map the stream to any of the eight virtual outputs. Here they are mapped to Output Channels 1 & 2. To pull this stream into another app, select the “Out of SJ” card as the audio input of that app.
NOTE: SoundJack appears to accept virtual cards with two, four, eight, or sixteen channels. If you want to run a twelve-channel session, you must use a sixteen-channel card. It will not recognize channels nine through twelve of a twelve-channel card.
The send channels
If the Audio Input dropdown controls how many simultaneous channels of audio could possibly come into SoundJack, the send channels dropdown controls how many actual channels you send to the other users. You may have eight potential inputs. If your send channels is set to stereo, you will only send two of those potential channels. This is covered in more detail in The SoundJack Guide, but note that mixing send channel settings in a session can get complicated. If everyone sends a mono stream, the actual data sent is dual mono generated from the single mono input, that is, an identical stream in each ear, but the number of channels outputted per incoming stream is still one. If one person switches to dual mono or stereo, the results depend to an extent on the audio interfaces being used. Some will default to sending audio to only one ear, which is fixed by switching to dual mono. Once this seal has been broken, the only way to revert to a true mono session is for everyone to refresh the stage and change their send channelsback to one channel mono before reconnecting.
In practice it does not matter whether your peers send mono, dual mono, or stereo. But keep in mind when we discuss the actual channel mapping dropdown, that the value selected is the starting channel. If someone sends dual mono, this means they pull from two channels of their audio input and combine that into an identical mono stream in each ear. Their incoming stream will actually take up both the output channel you map them to AND also the next higher channel. If you have a call with incoming streams from four single channel mono peers, you will need four output channels on your audio output card. If they each send dual mono, you will need eight output channels.
The hexnut audio input channel selector
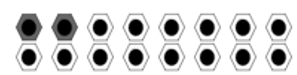
This unlabeled stage tool does not control the number of possible input or output channels, nor does it control the number of actual channels of audio you stream to your peers. What it does control is which of your input channels you send. Think of this as two rows of eight channels. Starting from the top left, each hexnut corresponds to channels one through eight. The next row corresponds to channels nine through sixteen. In the above image, note that the first two hexnuts are filled in black. This means that you have chosen to send two actual streams in the send channels dropdown and that you are drawing from the first two inputs of your audio input device. The hexnuts allow you to decide which two inputs those streams come from. If you have an eight-channel card for your input, you could click any of the firsts seven hexnuts in the top row. This would map those two inputs to your SoundJack audio input. If you have an eight-channel card with a stereo keyboard plugged into channels five and six, you set your send channelsto stereo, and click the fifth hexnut from the left in the top row. If you click a hexnut of a higher number than you have audio input channels (as selected in the audio input dropdown), the VU meter will turn red indicating an audio error.
The map channel selector
The map channel selector is the final step in the SoundJack audio routing process. Those already familiar with making and optimizing connections on the SoundJack stage will be familiar with the jitter buffer dropdown to the right. This “other” dropdown in each user’s entry maps their incoming stream to a specific output channel on your audio output device. If you leave all of them at the default of channel one, all incoming streams map onto the left or both channels of the stereo mix depending on the send channels settings. If you have four incoming mono streams, you may individually map each user to a different output. These streams will then individually send to the corresponding Pass-Thru channel on the “Out of SJ” Loopback virtual audio device. You can then route that stream to any output channel in that virtual audio device that you wish.
NOTE: if you do not turn off the SoundJack self-monitoring, the slider below the left VU meter on the stage, your audio input will always map two channels to the output 1 & 2. Connecting to your localhost or own user elicits the same behavior. If you want to test mapping output channels, use the public servers instead.
Examples
Consider the following two images. In the first, a different eight-channel virtual Loopback device is selected for each of the audio input and output dropdowns. Send channels is set to 1 (mono). The real input from the audio input virtual card is pulled from input channel one (top left hexnut). I have connected to the Virginia mirror in SoundJack and mapped the incoming stream from that mirror to channel six of the eight channel audio output card (shown to the right). That stream comes into channel six of the Pass-Thru and is connected to channel six of the output. Select “Out of SJ” as the input card of any other app, and this stream will come in on channel six.

In the image below, there are two channels coming into SoundJack (send channels set to 2 (dual mono)). Once again, I bounced this two-channel audio stream off the Virginia mirror. This time I mapped the output to channel three on the audio output virtual card. Because it is a two-channel stream that I start on SoundJack output three, it sends one channel to output three and the other to output four. This is visible in the Pass-Thru input tile of “Out of SJ” and Loopback sends these channels to output channels 3 & 4.
Conclusions
What one does with this information is limited to an extent by one’s imagination. The two workflows I use most frequently are (1) to interpose a real time VST plugin host before sending the SoundJack audio along to broadcast through Zoom (as explored in this guide), and (2) to send audio to Logic Pro X for a multitrack recording session.
These workflows are beyond the scope of this guide, but consider in rough terms how it might work. For the real time VST plugin host workflow, each incoming SoundJack stream is routed to a different output channel. I select the audio output card from SoundJack as the input card in my VST host. In the below image, from the VST host app GigPerformer3, imagine that the first two channels are a singer sending a stereo stream. The third and fourth channels are the pianist sending a stereo stream. I have placed a gain adjustment plugin and a multiband compressor in each peer’s signal chain, and combine them in a final mastering multiband compressor that dithers and levels the outgoing stream. The audio out is the Loopback virtual device called “Into Zoom,” and will become the input for the Zoom app. In this way, audio from SoundJack is professionally mastered and leveled before being broadcast over Zoom. The same basic idea holds for Logic Pro X (or any other DAW). Select SoundJack’s output virtual audio card as the input to the DAW, and assign each separate input to its own recording channel.
