
LiveLab.app (top) paired with SoundJack.eu (bottom) for lagless audio and laggy video in 2020. Pictured here, some members of the NEC Distributed Music Research Team (left to right, Ian Howell, Nicholas Perna, Chadley Ballantyne, Joshua Glasner).
What is LiveLab, and Why Would I Use It To Teach Music?
26 March 2021
By Ian Howell
Abstract
The SARS-CoV-2 pandemic of 2020-21 challenged the music education community to research and adopt new platforms to enable high quality, technology assisted remote lessons. LiveLab.app is a simple, lightweight, and free solution that provides high quality interactions at latencies much lower than Zoom. This article explains how LiveLab works, outlines the ways in which it is different from standard video conferencing apps, and offers a simple workflow for use in music lessons. For those interested in broadcasting distributed performers, LiveLab pairs well with OBS and offers advanced media stream routing. For schools or companies interested in experimental audio/visual workflow, LiveLab can be installed on a LAN (not covered in this article).
License

This work is licensed by Ian Howell under the Creative Commons Attribution-NonCommercial-ShareAlike 4.0 International License. To view a copy of this license, visit http://creativecommons.org/licenses/by-nc-sa/4.0/ or send a letter to Creative Commons, PO Box 1866, Mountain View, CA 94042, USA.
TABLE OF CONTENTS
Backstory And Introduction
What Is LiveLab?
What Do I Need?
How Does It Work?
Main LiveLab Window
Main Video Area
Settings And Controls
Workflow For Teaching A Lesson
Why LiveLab? Why Not ? What About Zoom’s Feature?
A Final Thought About Pairing Livelab with Actual Low Latency Audio Apps
Backstory and introduction
Early in the summer of 2020, the NEC Voice and Sound Analysis Lab began experimenting with a number of low latency audio apps, including JackTrip, SoundJack, Jamulus, JamKazam, and later in the summer QuackTrip and Sonobus. A few of these offer video as well, but the CPU load tends to be high and the quality either low or slow enough that it falls behind the audio. This is especially true over the commercial Internet. On a campus network this is much less of an issue. At the time, it appeared that WebRTC-based video apps offered the best chance to decrease video latency below Zoom (the default for many). Early candidates included Jitsi Meet and Source Connect Meet (now discontinued). Neither had audio that beat the quality or latency of an app like SoundJack, but in most cases their peer to peer design was a notable improvement in video speed over Zoom’s server-based system.
We coalesced around a set of values as we explored these apps.
Solutions must be free to students, available on multiple platforms, and an improvement over what they replace, and
Solutions must address limitations in this order:
audio quality
audio latency
video latency
video quality
Midsummer, as I was preparing to teach the Online Teaching Technology Course for the Acoustic Vocal Pedagogy Online Course, I was introduced to a WebRTC app called LiveLab. LiveLab is Chrome browser-based, like Jitsi Meet and Source Connect Meet. Unlike those apps, it does not aim to replace Zoom’s video conferencing capacity. There is no whiteboard, no recording feature, no wasted pixels to persistently show controls, no obligatory Brady bunch template. It is really a different animal.
Even into the beginning of the fall semester, LiveLab was a curiosity but clearly in beta. Though it never happened to me, more than one person experienced a “surprise meet-and-greet” as different LiveLab sessions collapsed into one another. This is concerning, especially if you teach minors. The native audio was also not great. However, their development team has solved these issues and the LiveLab now available is different. It is stable, dependable, has high quality audio, and does exactly what it sets out to do. If you have not given it a second look, now is the time. If you are new to it and would like a better option than Zoom, give it a try.
What is LiveLab?
LiveLab is a peer to peer, …”browser-based media-router for collaborative performance…” It is a product of CultureHub, and was originally designed to connect multiple site specific theater spaces. The description may be a little wordy, but stick with me. “Browser-based” means it runs in Chrome. Unfortunately it is not iOS compatible, but will run on the Chrome browser on basically any other computer device (including Chromebooks) at LiveLab.app. There is no app to download. Everything is controlled within a single browser window. “Media-router” means that it takes audio and video streams from one place and sends them somewhere else. This is essentially what Zoom and other video platforms do. They pull in an audio and video stream each from a set of distant participants, send those streams to a server computer, and format those streams to display on your screen. LiveLab differs fundamentally in this last part. It does not aim to push incoming streams into specific places in a Brady Bunch template. It does not limit the number of audio and video streams each participant can send, nor does it force a specific video resolution or audio quality. It does not limit how you choose to view those streams as an end user. It runs in peer to peer mode, saving time by avoiding the trip to a server. And perhaps most importably, it does not require you to keep the streams in LiveLab. It is a perfect tool to bring low latency (not quite real time) video and audio streams into your computer and then send them out via an app like Open Broadcast Software (OBS).
Whether a voice teacher uses all these advanced features or not is not the point. The key feature of LiveLab for musicians is that it ticks off solutions 1-3 above: the audio quality is high, and the audio and video latency are very low. As a stand alone solution, this app is indicated for any lower latency (not quite real time) online music education where a few basic conditions can be met. Combined with SoundJack or JackTrip Virtual Studio for low latency, high-quality audio, we have a solution that solves the most pressing challenges.
What do I need?
To get the most out of LiveLab.app, you need:
A computer or Chromebook running the Chrome Browser
Ethernet (or you will experience lag and pauses like with Zoom)
Headphones (or you will have to use an echo cancellation tool which negatively impacts the sound like with Zoom)
Ideally you also have a high quality microphone and an external audio interface, but this is not a dealbreaker. LiveLab.app is a garbage in/garbage out system, so it will transmit whatever sound you capture without additional distortion. By all means use it without the ideal setup, but you will be the happiest with the results if you do.
How does it work?
Open a Chrome Browser window and go to https://livelab.app. You will see this window:
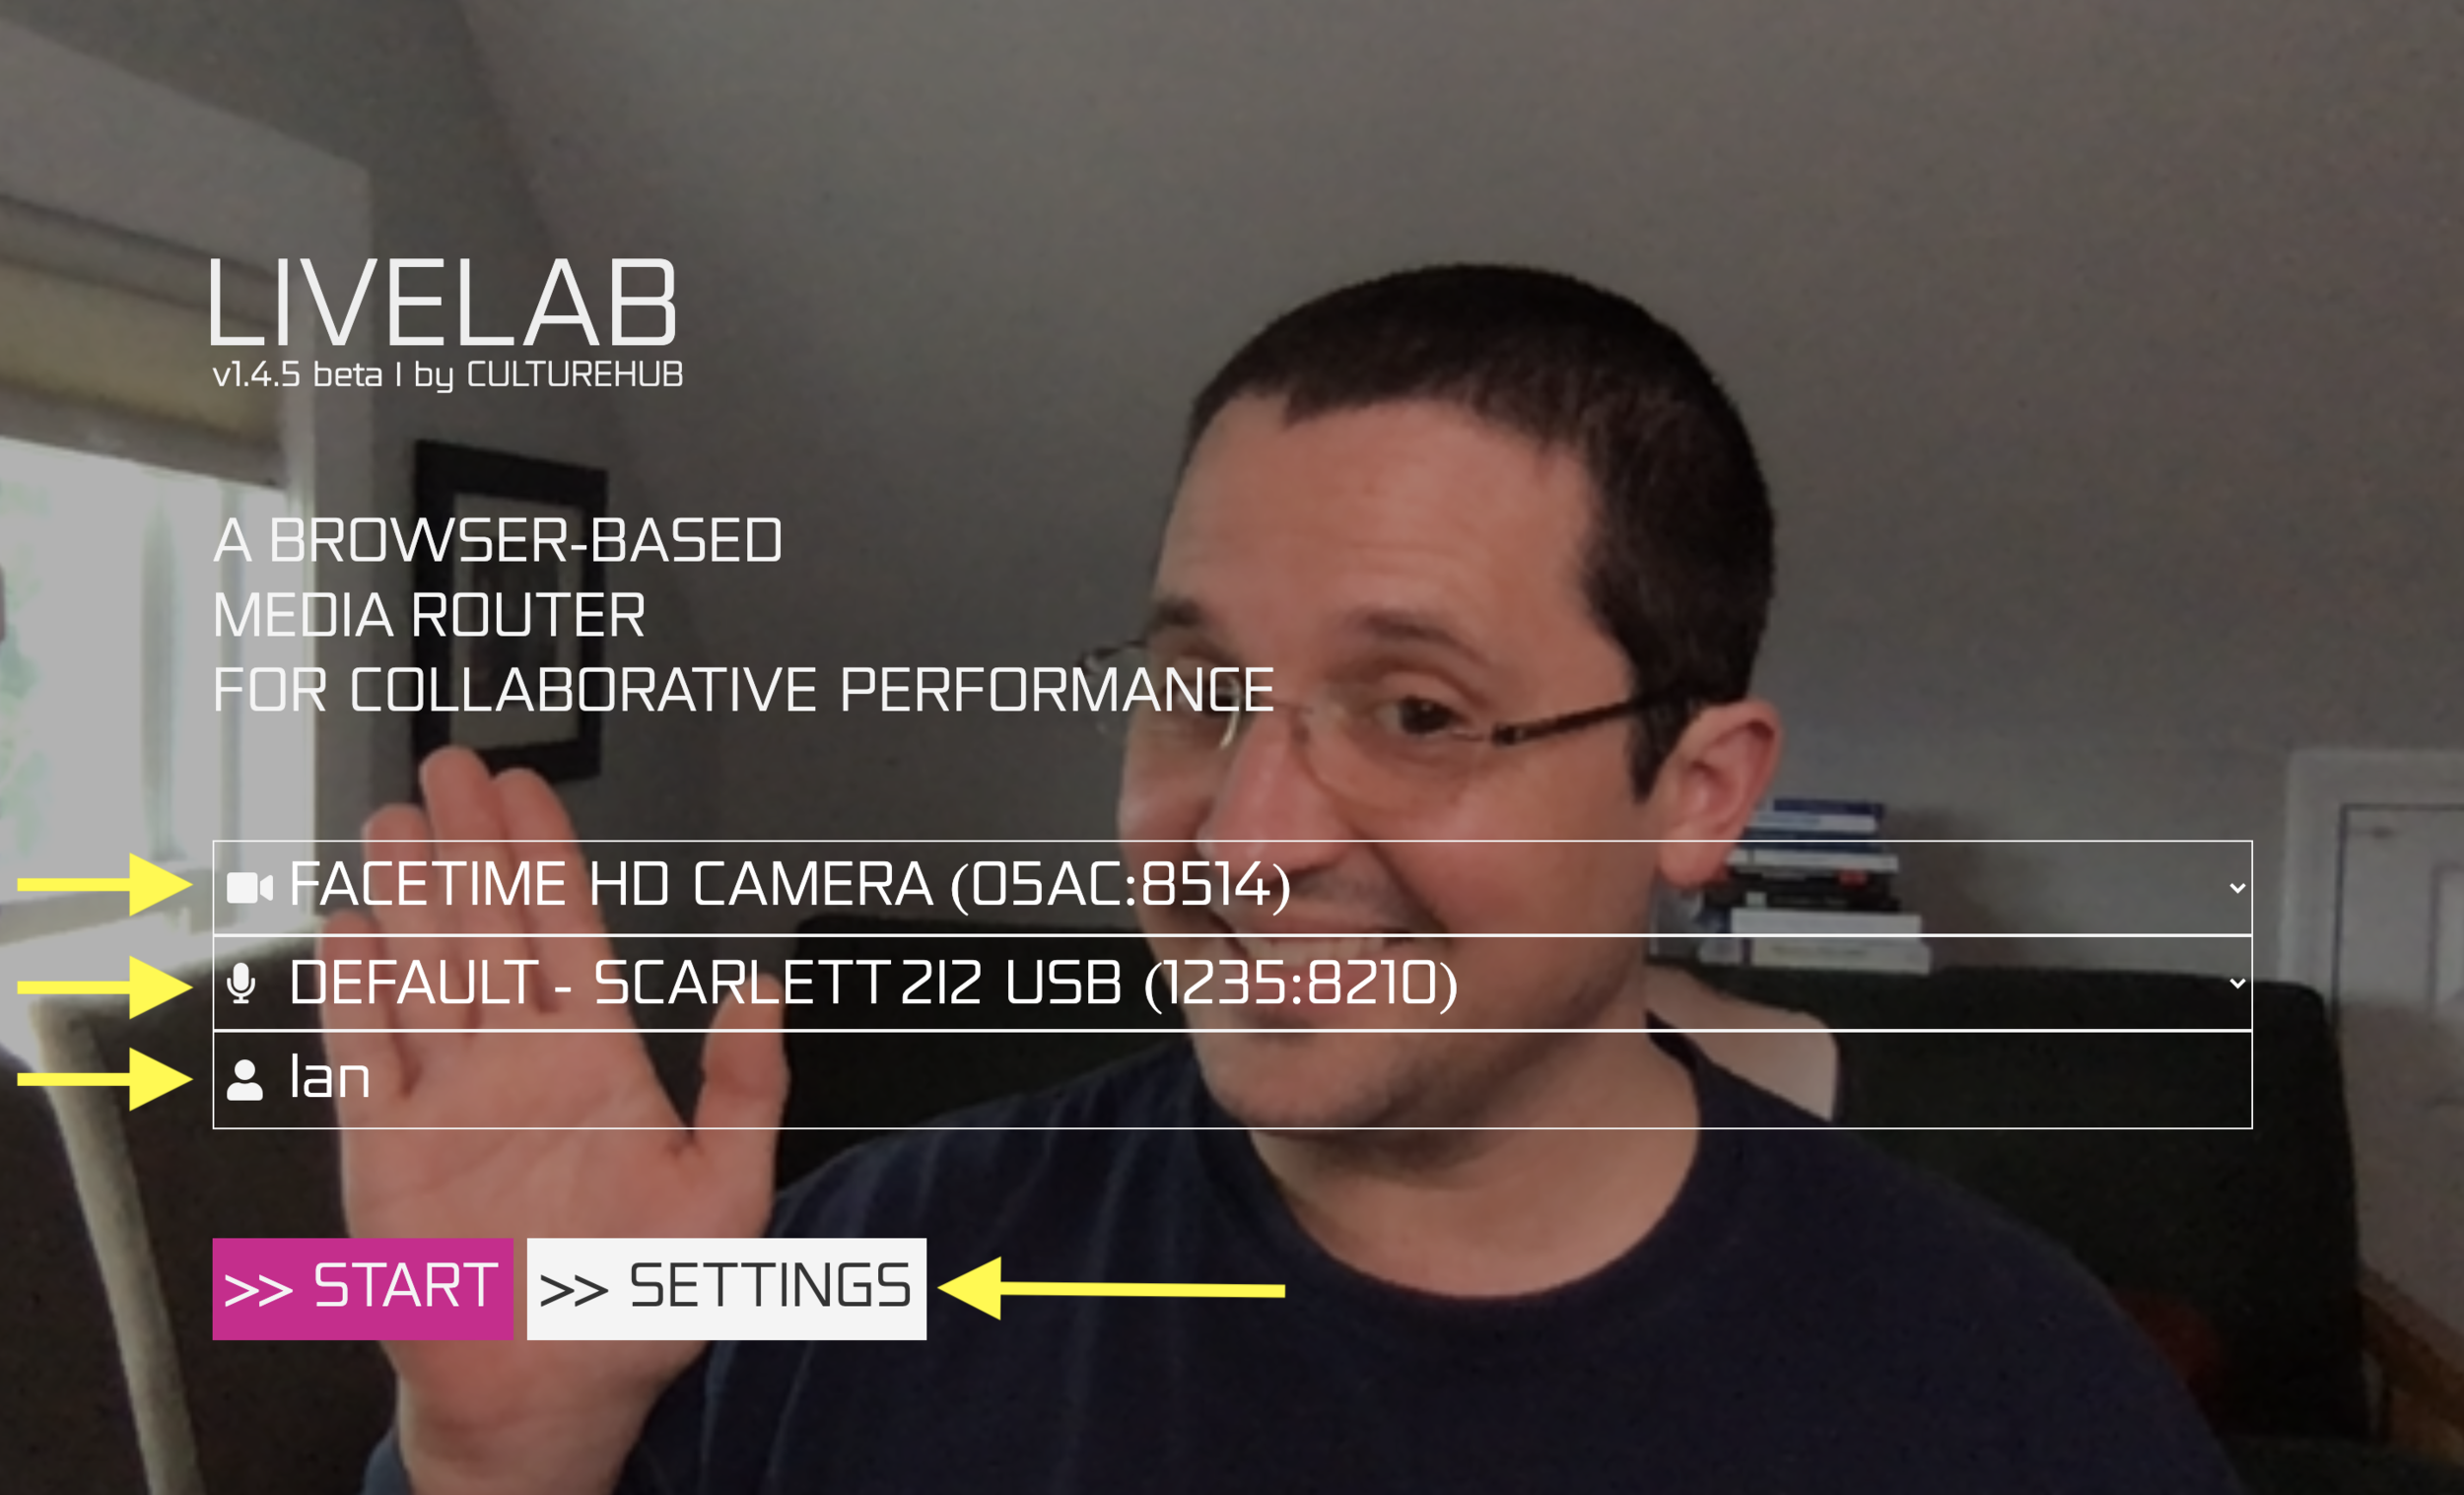
Select your camera and your audio source here, and add your name if you like. You can choose from more than one connected camera if you have other options. You can select from any connected audio source, including virtual audio devices (like Loopback devices). Chrome may challenge you to give it permission to use the camera and microphone. Accept these requests. You can also wait to select your camera and audio source until after you click settings.
In your system sound, select either your built in headphones or audio interface headphones as your audio output. This is important to avoid feedback when you disable the echo cancellation.

Unless you want to use the echo cancellation in LiveLab, it is crucial to set your system audio output to an option with headphones (here a MOTU M2 USB audio interface)
Click settings on the LiveLab page to enable the high quality audio settings. Uncheck echo cancellation, auto gain, and noise suppression. You can press the play button to listen to the effect of your choices. If you change a setting you must press play again.

For full quality audio, uncheck echo cancellation, auto gain, and noise suppression.
Click save, and then start.

Livelab then launches the main window and creates a random room URL. You may send this URL to anyone who wants to join your call.
If you replace everything after the “?room=” with your own custom text and then hit enter, you can personalize the URL for your room. Like any WebRTC app (e.g. Jitsi Meet), these rooms only exist when someone enters that URL in a browser. There is no waiting room. If you keep your URL both complex and secret, you can use plain English text that is easy to say over the phone. E.g. https://livelab.app/?room=thisiseasytoremember. <—That is a functional LiveLab room, and anyone who has this link can go there now. I give a bit.ly URL shortener link to my students. This is an easy to remember URL that redirects to a more complex LiveLab URL. If I want to change the LiveLab URL, I change what the bit.ly link redirects to.

You can customize your room URL and use plain English words. Remember, anyone can enter any URL so pick something long enough that no one will guess it.
All participants do this, and they automatically enter the room when they hit return.
Main Livelab window
The LiveLab landing page has a main video area and a strip of controls down the right side.

The main LiveLab window. Mouse over each stream to reveal a set of controls for that stream. The main settings and controls are along the right side of the window.
Main video area

Any participant who enters the same LiveLab room (image below) will appear as a video stream in the main video area. These video streams are maximized to fill the entire available area and center on the middle of the frame. If you resize your main LiveLab window, these video streams will dynamically resize, keeping the center of the stream in the center of the available space, resizing to preserve either the width or height dimensions of the stream. If you want to see everyone’s full frame in the main video area, you can go to settings and uncheck “stretch to fit” (see next section). If you mouse over any one video you will see controls appear at the bottom (image below). From left to right you will see their name, a camera icon that allows one to mute their own video source, a microphone icon that allows one to mute their own audio source, and a square with an arrow that allows one to pop that video out.

The ability to pop video streams out is one of LiveLab’s best features, as it allows each participant to maximize what they wish to see. You could use this separate window as an input source in a broadcasting app like OBS. Or, you could pop out multiple incoming video streams and custom arrange windows on your screen (see image below). You could also pop out a single stream and then full screen that window (although some space is lost at the top for the URL bar unless you uncheck “Always Show Toolbar In Full Screen from the Chrome View menu), or arrange that window side-by-side with a PDF of a music score. You could add a screen share (see below in setting and controls) of an app and the other participant could watch the output of the app on your screen in a separate, popped out window. This is helpful if you want to keep an eye on a status page on your student’s computer, or if you would like to share a real time spectrogram of your student singing.
To quit any stream you are sending (audio or video), click the white X in the upper right corner of the stream on the main LiveLab window. This is true for video streams as well as audio-only streams.

Screen shot of two different incoming LiveLab stream windows popped out and arranged for a custom full screen view during a lesson.
If you right click (two finger click on a trackpad) on a video stream window, you can select two additional options: show controls and picture in picture.

If you select show controls, YouTube-like video controls will appear at the bottom of the video window. You may not want to be able to pause the stream, but the play/pause button allows this. The most common feature is to choose the full screen button, which full screens the stream with no wasted screen space.

If you choose picture in picture, LiveLab pops out a video window that stays on top of any other window. This window can be resized up to its actual resolution.

Settings and controls
Along the right side of the Main LiveLab Window are the settings and controls. From top to bottom they are:

Video stream(s) mute
Audio stream(s) mute
Add screen share (like other WebRTC and video conferencing apps, LiveLab allows sharing the entire screen, an application window, or a specific chrome tab)
Add media stream (an addition video or audio source, including virtual audio devices like LoopBack)
Hang up the call, which ends the session
Settings, which allows for switching between stretching to fit vs full resolution main window video streams and other tools useful for broadcasting
Output volume controls
Message chat any participants
Participant list, which includes information about their streams
Hide/show settings and controls
Many of these tools are self-explanatory, but a few bear exploring.
Add a screen share
If you wish to share your entire screen, select “Your Entire Screen,” click to select the entire screen preview window so that a blue border appears, and click share. Similarly if you wish to share an Application Window or Chrome Tab click the appropriate source window so that the blue border appears, and click share. Whoever receives a screen share will likely want to pop that video source out and position it as a separate window.

Add media stream

If you wish to add an additional video source (likely a second camera or the same camera with a different aspect ratio) or an additional audio source (could be a second audio interface, but may also be a virtual audio device), click the add media stream button. The window that pops up to add either video or audio is the same window you see after pressing settings when first entering a LiveLab room. Note that you can manipulate the dimensions of your video stream (up to a limit) and set the audio algorithms to either send high or low quality. You can add video or audio alone, or a stream with both video and audio.
Note that at this time, LiveLab tends to use lower video resolutions than built in MacOS FaceTime cameras are rated for. If you experiment with the width and height settings, you can crop a video (e.g. a camera trained on a piano keyboard) before sending off the video stream.
Settings
Those who use LiveLab to teach may only want to toggle the stretch to fit option to off in the settings area, although I would encourage most to pop out and full screen whichever video stream they want to see. The other options are more appropriate for those looking to use LiveLab to create more complex broadcasts. In a situation where you might have multiple incoming streams that you will select from to broadcast from OBS, consider adding two output switchers. Pop these switcher windows out and select them as inputs to OBS. Within LiveLab, assign any incoming video stream to an output switcher with any level of fade. Cue up your next crossfade source in the other switcher window and do the actual crossfade within OBS. This keeps the complexity of the incoming streams in LiveLab, and allows the switch in OBS to go back and forth between two sources. The column layout option is most useful if you want to leave a number of the settings and controls tools open and active. It resizes all the video windows so no control windows cover a video stream.
Workflow for teaching a lesson
Despite the complex broadcasting tools, and the potential for multi party peer to peer video and audio LiveLab offers, my most frequent use case involves connecting to one or two other participants for a voice lesson. If I connect to one person for a laggy lesson (that means I will use LiveLab’s high quality audio and expect it to be faster than Zoom but not fast enough for real time collaboration), I first make sure we both set up our audio as outlined above: computer system audio output set to their headphone, audio source set to their microphone, and echo cancellation, auto gain, and noise suppression all unchecked. Once on the main livelab window, I either pop their video out and full screen that window or right click their video stream, turn on show controls and click the full screen icon there. This is as high quality as Cleanfeed’s free version, and integrates synchronous video and audio into the same app. Anyone currently using separate solutions for laggy audio and video should switch away from Cleanfeed or Source Connect Now if they otherwise meet LiveLab’s requirements. If I want to watch more than one incoming video stream at once (e.g. a singer and a pianist or a singer and some app window on their computer), I pop their video stream windows out individually (mouse over the video window and click the square with the arrow pointing out button), resize them, and position them on my computer screen. I minimize the main LiveLab window and never look at myself. I walk my students and collaborators through the same process.
Why livelab? why not ? What about zoom’s feature?
One of the great technology lessons of the pandemic for me has been feature creep. Are some things better now because of technology? Maybe. But features that I did not use before should not be an argument to use a substandard platform like Zoom. It is cool to be able to record and archive lesson videos. But Zoom compresses the audio when recording to the cloud, and that storage takes up actual space on computers that require rare earth mining and power for cooling and processing. If students want to record themselves on their own computer for a special occasion, or even if you want to run an app like Audio Hijack to record the audio of your lesson, have at it. I do not personally think the ability to record videos outweighs higher quality audio and faster audio and video. The one tool I use Zoom for is controlling someone else’s shared screen. LiveLab does not offer this and it comes in handy when setting someone else up to take online lessons.
Even within the pool of similar apps, why LiveLab? The audio quality is similar to Cleanfeed or Source Connect now, but integrated into the video solution. Jitsi Meet, likely the most popular WebRTC-based Zoom alternative, switches from peer to peer to a slower server-based connection with the third participant. Since Jitsi Meet strives to replace Zoom, it has a number of extra tools and a clunkier interface.
If your goal is to allow the technology to become transparent—to see your collaborator through the screen rather than see the screen the collaborator is on—LiveLab is the best current solution. It offers fast video and audio connections that prioritize audio quality. It is flexible enough to allow one to do more advanced things that would be a challenge in Zoom (add a second audio source or custom sized shared app window, for example), but simple enough that one can get up and running quickly.
Last, and this may or may not motivate you, LiveLab is a free tool offered by Culture Hub. Culture Hub is a non profit arts organization dedicated to the intersection of art and technology. They explicitly aim to bring, “artists, activists, and technologists together to envision our role in re-shaping the future.” If you are in the arts, and especially if you are in the immersive world of modern theater, these are your people. They are interested in creating tools that enable further creation. They are not aiming for a slice of the business meeting market. Their values are much more likely in line with yours than Zoom’s.
The one argument for using an app like Zoom over LiveLab is if your connection is very poor. LiveLab excels over ethernet. Zoom will do a better job of buffering poor WiFi connections.
A final thought about pairing livelab with actual low latency audio apps
There is currently no perfect solution for video latency over the commercial internet. SoundJack, JackTrip, and similar low latency audio platforms can decrease the audio latency to the point that it is perceptually lagless. The best we can get with video (at least with free solutions over the commercial Internet) is close to that. If you are on a closed network, like a campus or home network, the video built into an app like SoundJack becomes incredibly usable. Over the commercial internet, SoundJack video is going to hit an upper limit of peers quickly. And it is worth pointing out that the cheap raspberry pi SoundJack solution (the Fastmusic Box) does not support native SoundJack video. This is also true for JackTrip Virtual Studio.
In these circumstances, I would encourage you to explore using LiveLab in video only mode. This means when you join the call, choose no audio and then start. If something happens to your low latency audio stream, you can always add a media stream and quickly speak to one another using your built in computer mics without unchecking all the audio compression options.